When creating a new track in the digital environment, it usually takes some steps to properly set up a virtual instrument. Locating samples on the hard drive, loading them into a sampler, routing MIDI tracks and outputs inside the Digital Audio Workstation (DAW) and setting up reverbs and effect chains can be quite time consuming processes.
Therefore, media composers often run big templates on their systems to be able to work fast and to keep the creative flow alive, without being interrupted by such tedious tasks. It’s not unusual for audio professionals to have 1000+ tracks preconfigured inside their DAWs, which requires a very powerful machine. With several modern orchestral sample libraries (strings, brass, woodwinds, percussion, choirs), virtual pop/rock/world instruments (guitars, ethnic drums, etc..) plus some sound design libraries loaded into your sampler, even 64Gb of installed RAM or more are sometimes not enough to run such a big template.
Since Native Instruments Kontakt 5 sampler has manifested itself to an industry standard, here are some tips to optimize its RAM usage quite dramatically:
1. Stream Samples From Disc (DFD)
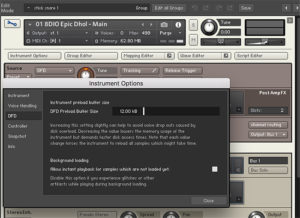
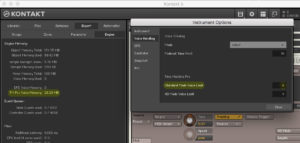
Instead of loading an entire sample into RAM, Kontakt 5 also gives you the option to stream directly from your hard disc (DFD). However, the initial part of the sample still has to be loaded into RAM. The good news is, Kontakt lets you decide exactly how big you want this “preload buffer” to be. This can be adjusted on a global or on a “per instrument” level. I would suggest the latter, and the related options can be found by clicking on the “wrench” icon in any loaded Kontakt instrument. Next, click on “instrument options” and the “DFD” tab. There you will find a little slider which allows you the choose how much of the initial part of a sample will be loaded into RAM. Keep in mind though, that lowering the preload buffer means lowering RAM usage, but also means that your CPU needs to work a little harder.
(Click on image to zoom in)
If you are running your samples from a SSD (Solid State Disc), you could set the “preload buffer” as low as 6 kb. Personally, I only use this setting for instruments which are generally low on CPU (don’t use a lot of voices) and don’t play a lot (A good example would be a “sub boom” patch of a sound design library). For my workhorse patches, such as my string sustains, I found 12 kb to be a good setting for the preload buffer. Notice how the displayed RAM usage for samples decreases as you decrease the buffer size.
If samples are streamed from a normal 7200 rpm drive, I’d suggest to use a higher setting between 30 and 44 kb (which is still lower that the default 60 kb buffer).
NOTE: This does not work for patches using Kontakt’s “Time Machine”, “Time Machine Pro” or “Beat Machine” algorithms.
2. Purge Samples From RAM
Kontakt 5 is capable to purge samples which are not currently used in your track to free up your RAM.
For example, you might only use the notes from C3 to G4 in a piano patch throughout your entire piece. Kontakt is able to detect which notes are not used in your composition and you can remove all the unused samples from RAM.
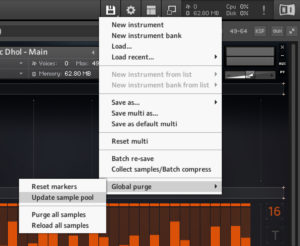
Again, this function is available per instance and per instrument. This time, I would recommend to use it on a “per instance” level, as I found that the sampler is capable of loading samples “on the fly” as they are being used in your arrangement. I removed all the samples of all the instruments in my template from RAM by choosing “reset markers” and “update sample pool” in the Load/Save – Global Options menu. In other words, no samples are loaded into RAM when I open my template.
By doing so, Kontakt will only load samples into RAM that I will actually use in my track. With my setup, this process works in realtime as I play in my parts, without any glitches, artifacts or additional latency, and works no matter if samples are stored on SSD or normal hard drives.
3. Reduce Voice Memory
In addition to the memory reserved to store samples, the polyphony of every instrument takes up “voice memory”. Depending how many and what kind of effects (inserts, sends, scripts, etc…) within an instrument are being used, every voice is allocated a certain amount of memory.
Therefore, I highly recommend to reduce the maximum number of voices to what is actually needed to play an instruments without “killing voices”. To do so, play the instrument as you would use it in a busy part of your arrangement, while monitoring the voice count. Then set the maximum voices to about what was your maximum voice count during playback (actually, a little bit higher, just to be save! – and be careful when loading additional microphone positions, as this usually increases your potential maximal voice count!).
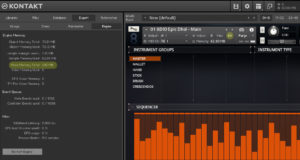
In the screenshots above, notice how the voice-memory-usage was reduced from 10.34 mb (799 voices) to 1 mb (64 voices). Doesn’t seem a lot? Well, If you have a few hundred instruments loaded, it adds up!
A lot of voice memory is allocated for instruments using Kontakt’s Time Machine, Time Machine Pro or Beat Machine algorithms. Keep an eye on the maximum number of voices under “instrument options -> voices”, as sometimes the default values are set unnecessarily high by instrument developers. There is no reason to set this number to 99 voices (which can take up several hundreds of megabytes of RAM alone!), when you’re only using 2-3 voices to playback a loop.
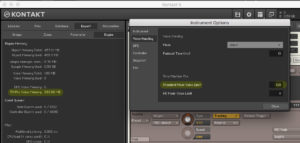
When comparing the two screenshots above, you can see that in this instrument (a drum loop library), 128 Time Machine voices take up 393.98 Megabytes of RAM, whereas 6 voices only use 28.29 Megabytes. Of course, with a maximum number of 6 voices you can only play 6 loops at the same time in this patch, but in a realistic writing-scenario you won’t need more anyway, so don’t allocate RAM for more polyphony if you can predict you won’t need it.
On a side note, most developers use the standard mode of “Time Machine Pro”, so in most cases adjusting the maximum number of voices for the “HQ” mode won’t make any difference. Just pay attention to whether the “HQ Mode” button in Kontakts Time-Machine settings is active or not.
4. Deactivate Convolution Reverbs
As described earlier, every insert-, group-, bus- or send effect within a Kontakt instrument uses a little bit of memory. For most effects, this ends up being only a fraction of a megabyte per effect and is probably not even worth to think about.
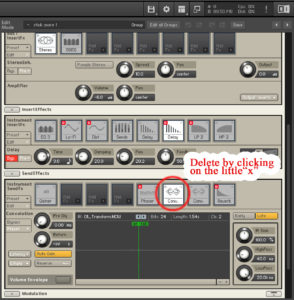
However, it might absolutely be worth it to deactivate convolution reverbs and delays within Kontakt if you are not planning to use them (a 3 second convolution reverb impulse response takes up about 20-30 mb of memory). Personally, I prefer to use my third party reverbs in my DAW instead, so the only thing that Kontakt’s own convolution effects do is taking up my precious RAM…
In most commercial libraries, there’s a delay or convolution reverb loaded as an insert or send effect by default, so make sure to delete it (bypassing is not enough!) if you don’t use it! You can access the FX-slots by clicking on the wrench-symbol in the top left corner of your Kontakt-instrument.
To give you some numbers, by deactivating all the reverbs and delays within Kontakt, loading my full template now uses 75 GB instead of 90 GB of RAM!
5. Deactivate The Database
Lastly, you can deactivate Kontakt 5’s internal Database if you’re not using it. Depending on how many entries there are, you could save some additional Megabytes of RAM per Instance.
To do so, click on Options -> Database and remove all the entries from the list. Also, make sure that “automatically add samples / files to the database” is unchecked.
And that’s it! That’s my five tips on how to decrease memory usage of Native Instruments Kontakt 5, I hope they become useful for your scoring template!



Huge Thanks!
Thank you very much!